How to catch flying birds on analog film
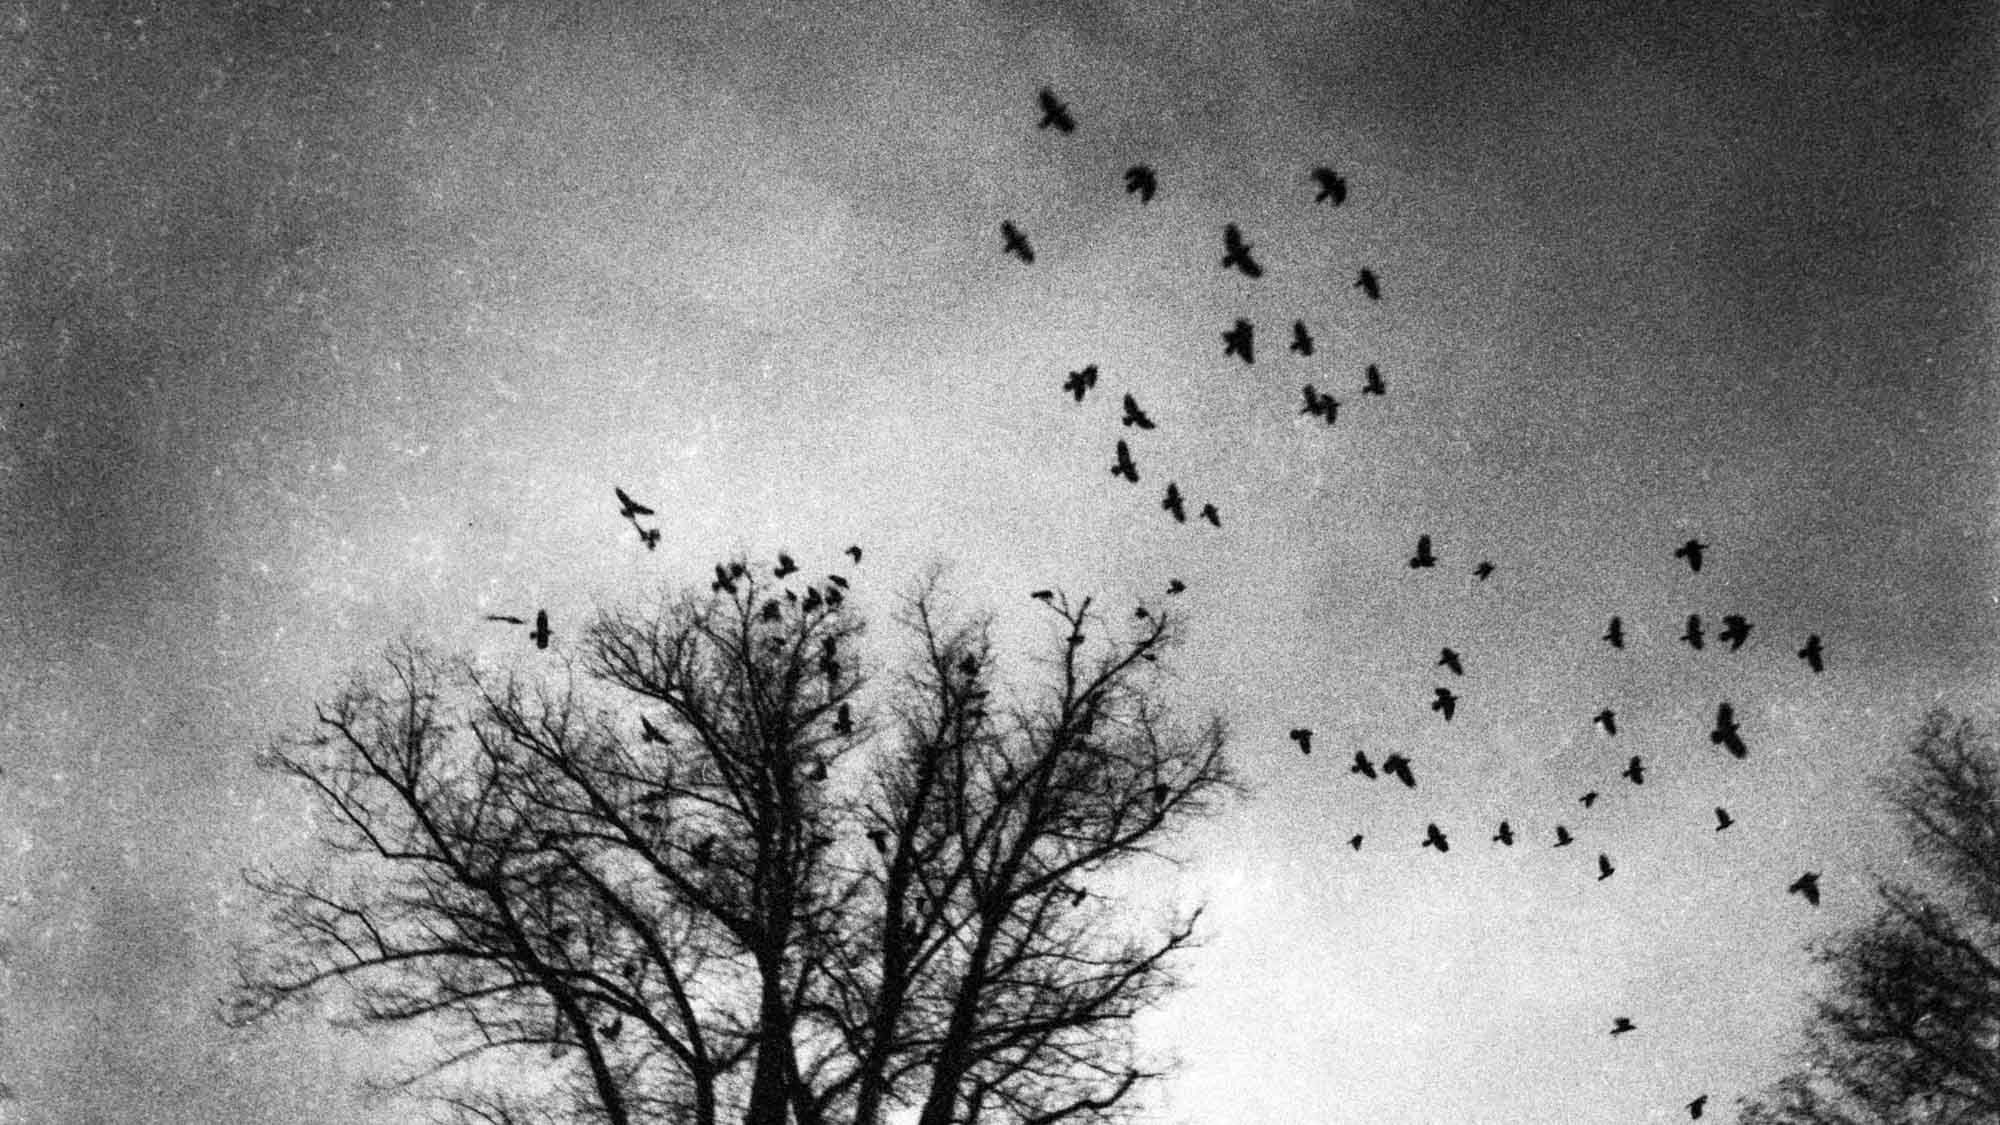
Hundreds of flying birds? Do you also think about Hitchcock's movie "The Birds" when there are lots of them in the sky and the mood is so mysterious...? That's what I associate when I see the flock of flying crows in the sky. And that's what I wanted to capture on black and white film.
So it's time for me to go "bird watching" and take some pictures of the spectacle and the amazing scenery.
HOW TO CAPTURE FLYING CROWS WITH AN ANALOG CAMERA?
For a film photographer it's a bit of a challenge to do this. You cannot directly see the results or the histogram and make immediate adaptations as you can with a digital camera. Therefore you have a lot to consider before you take the picture. It's a matter of being prepared to get the results you want.
In the following I give you my approach as a good starting point.
Find the location and observe
Every morning on my way to work I can see the crows show up on the high branches of the trees near the river. So I recognized the time they are gathered and are most active. Depending on the weather and season it's half an hour before sunrise (currently at 7:30 am) and before sunset (at 4:30 pm). With the knowledge of place and time you can better plan your photographing.
Choose the film
I also measured the exposure time to decide which film is the best. Due to the limited light a high ISO film speed is needed. Recently I bought some expired rolls of Ilford Delta 3200 Professional 120 film. So it was an easy decision to take these rolls and try out how it works. I checked how the film can be pushed and found out that with the ILFOSOL 3 an ISO up to 6400 can be used.
Choose the lens and camera
Because of the widespread mass of crows in the sky I recommend a wide-angle lens. It's the best choice to capture as much as you can. I used my Fujifilm GA645Wi which is a point and shoot medium format camera. It also has a 28mm equivalent lens that's gives enough space. Unfortunately the ISO can only be set to 1600. But later I found out that's not relevant because it's better to set the exposure manually.
Settings for the camera
I was out several times and tried different camera settings. The widest aperture of my camera is F4. Using a fast lens helps a lot to photograph in low light conditions. An exposure time of 1/30s is too low because you get too much motion blur of the flying birds. At least 1/60s should be used. In the next section I show you some results with different time settings.
If the available light allows it then use a shorter exposure time. During your session the conditions will change therefore check your exposure regularly with a light meter. Write down your used settings so that it's easier for you to decide which development is necessary.
Film development
Afterwards you have to develop the film. If you do it at home by yourself then you have more control over the process and for sure it's more fun ;-)
At first, I used the ILFOSOL 3 for the expired Delta 3200 and it works good enough. But I was curious about the MICROPHEN from Ilford. It's recommended for pushing film but I haven't used it before. I took this developer for a Delta 400 b/w film. The results can you see below.
RESULTS FOR THE EXPIRED ILFORD DELTA 3200 IN ILFOSOL 3
Not all images came out as I expected and it needed a bit of trial and error. But I liked the grainy and also blurred results. It gives the mood I wanted to capture.
The example on the left side and the picture above are from the same process/settings:
Camera: Fuji GA645Wi Professional with a wide-angle lens Fujinon Super-EBC 45mm (equivalent to 28mm KB) 1:4
Settings: Aperture of F4.0 and an exposure time of 1/125s seem to be perfect for the flying birds. There is not much blurring to see.
Film: Ilford Delta 3200 Professional - expired 2009
Grainy but I like it.
Development: With a rotary tube processor in ILFOSOL 3 (1+9) for 8:30 min @20°C EI 1600.
The instruction recommended a reduction by around 15% of the given development time of 10 minutes. That's needed for the compensation of the continuous agitation.
PUSHING ILFORD DELTA 400 FOR 3 STOPS
For another photo session I used the Ilford Delta 400 Professional film as I mentioned before. I read that this film can be pushed up to 3 stops with the MICROPHEN black and white developer. So it would lead to the high ISO setting I needed.
I developed the film with my JOBO rotary processor in a spiral tank with stock solution of MICROPHEN for 14 min @20°C EI 3200. The instruction recommends a 15% reduction of the given development time for the compensation of the continuous agitation. I didn't do that in this process and couldn't find any negative impact.
The following picture gallery shows you the difference in the exposure time from 1/60 to 1/30s. As expected with increasing time the blurring becomes more visible. So choose the time setting depending on the effect which you prefer.
All photos are taken with the same roll of Delta 400 and the Fuji GA645Wi camera at F4.
In the end I learned a lot and got the results I wanted to capture. Within the next weeks I will experiment further and improve my knowledge in pushing film.
What is to consider when you want to capture flying birds? In conclusion you have to find the right time in the early morning or at dusk and a good spot. Use a high ISO setting due to the low available light and a film that can be pushed. A wide-angle lens and a manual setting of the exposure time will also be helpful in the process. Last but not least a lot of patience and anticipation is needed.
Here are a few images in b/w and color from the last year. I took a Pentax ME Super with a fast 50mm lens. So you see that with a 35mm camera you can also get great results.
I hope that I have covered all essentials for you to start. How is your experience or do you have further questions? Please leave a comment below or get in touch via the associated media accounts.
Some further links:
- See my selection of flying birds on flickr
- Ilford MICROPHEN technical information
- Ilford ILFOSOL 3 technical data sheet
- First picture selected for kwerfeldein instakwer
Comments
Recent Posts:
Published at
24th November 2019
Author
Reading time / mode
Share
RssTags
Recent Posts
- Photo series: A winter day, captured on Kodak TRI-X 400 film
![Winter impressions in the snow by the river. Taken with a Minolta XD-7 camera on Kodak TRI-X 400 film. Winter impressions in the snow by the river. Black and white picture taken on Kodak Tri-X 400 film.]()
- Redscale film photography - the light from the other side
![Striking light. | Redscale pinhole photography with a Holga WPC 120 Redscale film photo shows a wood scene with a lot of trees and a striking light beam.]()
- Autumn walks and discovering the Kodak Gold 200 film
![Lights will inspire you. | taken on Kodak Gold 200 color film. Colorful Autumn path way with trees and sunshine.]()
- Photo series: Wakenitz taken on LomoChrome Purple color film
![Fern taken with LomoChrome Purple XR 100-400 film Fern in purple colors.]()
- Photo series: FP4 Party week and my foggy images
![Faded lights. | Hasselblad 500 CM taken on Ilford FP4+ film for the FP4 Party week Foggy view of a mystic path way along with trees and a biker in the center.]()
- Photo series: Discover the LomoChrome Metropolis film
![At any time. | LomoChrome Metropolis film | Fujifilm GA645Wi Skyline of Frankfurt am Main framed view through the bridge construction.]()

